|
| 關於housing in Fallout 4,參見Fallout 4 player housing。 |
在Fallout 4,獨存者能在联邦的眾多地方建造並管理自己的聚落。玩家能用新的工作台界面放置和連接尚未組裝的結購物和單獨物件(牆壁、地板、屋頂之類),以依照自己想要的方式建造自己的家。
這些聚落蓋好後就能大幅度客製化。你可以在建築和結構物裡面把家具、裝飾和燈光擺的美美的,在外面種作物、打水、發電,並幫你的新聚落做好防禦工事。為了幫聚落蒐集資源,你能拆掉各種各樣的物品。 當聚落達到一定的規模和/或玩家點了必須的特技,玩家就能蓋特殊的建築以邀人在聚落開店,像是Trading post能讓一個會賣某些全遊戲最好的東西的小販進駐。你也能在聚落之間建立Supply line以共享資源和物品。
聚落需要持續維護,因為裡面的居民需要像是收穫作物等基本生理需求。缺乏維護的話,作物會死掉,設備也會隨時間損壞。玩家需要開啟工房並用所需的垃圾進行修理,在工房模式走向一個損壞或失能的物品,會出現選項讓玩家能分解/修理該物品
大部份地點能在義勇兵任務線中碰到,其他則需要主動發現並完成該處的特別任務。
聚落地點[]

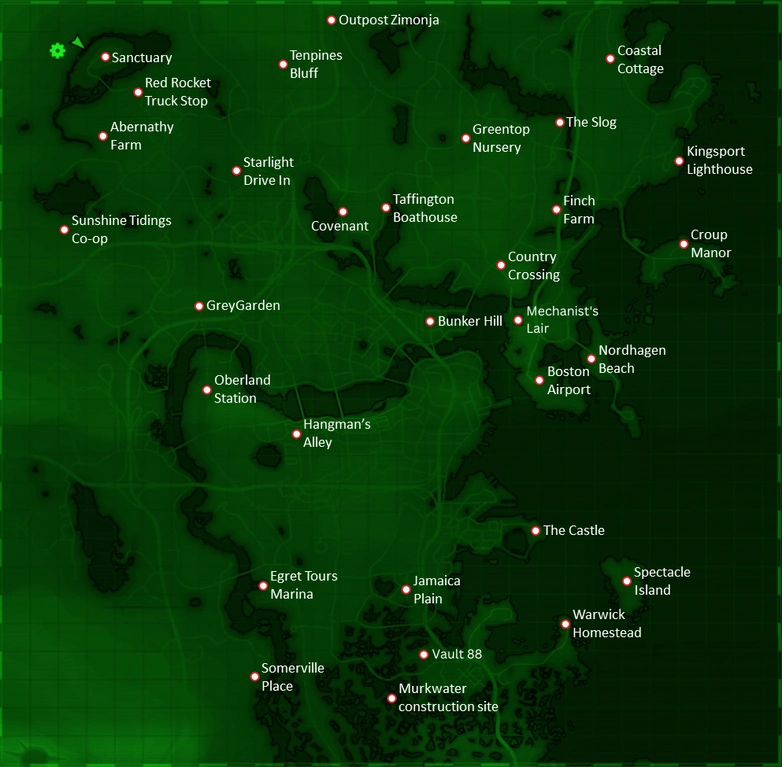
All possible settlements in the base game with the exception of Home Plate which lacks most settlement options, excluding add-ons
總共有37個可發現/可解鎖聚落,其中遊戲本體30個、Automatron一個、Far Harbor四個、Vault-Tec Workshop一個、Nuka-World一個。大部份地點都能透過完成特定目標或殺光該地敵對生物/居民,之後開啟工房就能入手。
聚落[]
| Legend | |
|---|---|
| |
| 地點 | 如何取得控制l | 既有工作台 | 備註 | 工房 RefID |
|---|---|---|---|---|
| 阿柏納西農場 | 完成報答恩情;或把阿柏納西一家趕走/殺光。 | 0006F5C5 | ||
| 波士頓機場 | 完成鋼鐵之影;或摧毀Prydwen以毀滅鋼鐵兄弟會,然後清光機場的狂屍鬼。在 | 不能種作物、不能蓋招募塔,但至少能蓋其他工作台。 | 000B3506 | |
| Bunker Hill | 在完成The Battle of Bunker Hill之後跟Kessler講話。 | 00019956 | ||
| 城堡 | 在毀掉一定數量的泥沼蟹蛋之後殺死住在該處的泥沼蟹女王。 | 有些工作台得等任務老兵舊砲完成後才能用。 | 00066EB6 | |
| 沿岸小屋 | 宰了住在裡面的唯一一個掠奪者。 | 能作為鐵路的藏身處。 | 00168945 | |
| 郡道岔口 | 完成一個義勇軍任務。 | 0009B1DB | ||
| 聖約村 | 在人为错误中站在聖約村一方並跟Jacob Orden談話;或者殺光該地的居民。 | 无论是支持还是反对村民,部分物品都将是红色状态。 | 000E0505 | |
| 克洛普莊園 | 殺光該地的狂屍鬼(包括地下室的)。 | 能作為鐵路組織的藏身處。 | 001654BD | |
| 白鷺游小艇碼頭 | 殺了Phyllis Daily;或讀取她終端機的個人日誌,並就Samuel事件中面對她(或直接說服她)。 | Phyllis Daily如果存活,不会成为居民。 | 00164321 | |
| 芬奇農場 | 完成火中歸來;或殺光該地的居民。 | 0009B19D | ||
| 格雷花園 | 完成渾水摸魚;或殺光該地的機器人。 | 0009B18F | ||
| 綠蔭苗圃 | 完成一個義勇軍任務。 | 0009B1F1 | ||
| 劊子手的小巷 | 殺光該地的掠奪者。 | 能作為鐵路組織的藏身處。 | 001F0711 | |
| 本壘板 | 在鑽石城市長室,用2000瓶蓋跟Geneva買鑰匙。 | 能蓋的東西很少,不能連補給線和招募居民。 | 00141DF5 | |
| 牙買加平原 | 殺光該地的狂屍鬼。 | 能作為鐵路組織的藏身處。 | 001654CF | |
| 金斯波特燈塔 | 殺光該地的原子神教信徒和狂屍鬼。 | 能作為鐵路組織的藏身處。 | 001654B8 | |
| 黑水工地 | 殺光該地的泥沼蟹。 | 遊戲內七天沒回來的話,會重生一隻泥沼蟹女王。 | 0016D28E | |
| 怒德哈根海灘 | 完成一個義勇軍任務。 | 0009B1BE | ||
| 高地車站 | 完成一個義勇軍任務。 | 0009B1D1 | ||
| 前哨基地席蒙尼亞 | 殺光該地的掠奪者。 | 能作為鐵路組織的藏身處。 | 00024A26 | |
| 紅火箭維修站 | 去了就能用。 | 基本上在此首度碰見狗肉,能作為鐵路組織的藏身處。 | 00054BAE | |
| 庇護山丘 | 去了就能用。 | 獨活者於2077年撤入111避難所以前都住在這邊,基本上也是獨活者離開111号避难所後第一個發現的地方,能作為鐵路組織的藏身處。 | 000250FE | |
| 爬泥地 | 完成一個義勇軍任務。 | 0009B197 | ||
| 薩默維爾 | 完成一個義勇軍任務。 | 001E81EA | ||
| 奇觀島 | 請參照該地wikia頁面。 | 能作為鐵路組織的藏身處,擁有最大的建地容積。 | 00161F4B | |
| 星光汽車戲院 | 殺光該地的鼴鼠。 | 能作為鐵路組織的藏身處。 | 0001D0E2 | |
| 陽光訊息合作社 | 殺光該地的狂屍鬼。 | 能作為鐵路組織的藏身處。 | 001654D5 | |
| 塔芬頓船屋 | 殺光該地的吸血虫。 | 能作為鐵路組織的藏身處。 | 00135A90 | |
| 十松崖 | 完成一個義勇軍任務。 | 獨活者在第一步中可能會去的其中一個地方。 | 0009B1AC | |
| 渥維克農莊 | 完成打造更好的作物;或一個義勇軍任務。 | 这里很可能无法接到義勇軍任務,如果学院已被发现 | 0009B1A5 | |
| 機械大師巢穴 |
完成恢復秩序。 | 不能種吃的,也不能招募人类村民。 | xx{{#pad:00b218|6|0|left}} | |
| Longfellow's cabin |
完成漫步公园。 | xx{{#pad:020650|6|0|left}} | ||
| Dalton farm |
在Cassie Dalton的任務中,完成Blood Tide第二部份。 | xx{{#pad:038eac|6|0|left}} | ||
| National Park visitor's center |
在The Hold Out中跟Uncle Ken講話後得到。 | xx{{#pad:00AB20|6|0|left}} | ||
| Echo Lake Lumber |
完成Turn Back the Fog後回報Small Bertha。 | xx{{#pad:01c6ae|6|0|left}} | ||
| 88号避难所 |
完成更好的生活就在地下。 | xx{{#pad:000fef|6|0|left}} | ||
| Nuka-World Red Rocket |
完成Power Play或狩猎季节,並恢復Nuka-World power plant的電力。 | xx{{#pad:00bceb|6|0|left}} |
概觀[]
可招募居民[]
遊戲中有些獨特的NPC,他們不能當同伴,但能在達成特定條件後說服他們去你的聚落。他们中的大部分都是通过随机事件遭遇。
- Doc Anderson
- Anne Hargraves
- 伙伴
- 耶洗别

- Ron Staples
- Trader Rylee
- The Scribe
- Smiling Larry
- S9-23
- Sheffield
- Tina De Luca
- 避难所科技代表
相關特技[]
- 枪支迷 解鎖更強的防禦設施。
- Hacker解鎖終端機。
- Armorer解鎖動力裝甲工作台。
- Science!。
- Local Leader能讓兩個聚落透過補給線分享資源。
- 該特技兩等解鎖商店和工房。
- Cap Collector兩等解鎖三階商店。
- Medic解鎖所有藥品店。
可建造物品[]
Nuka-World[]
在Nuka-World DLC中,獨活者能率領三個掠奪者團體(Operator、Disciple、Pack)擴張並暴力搶奪聚落,這些被佔據的聚落叫做掠奪者前哨站,一起佔據的掠奪者會住進去。這些前哨站不會被當作正式的聚落,而是成就和獎盃的一部分。
義勇軍聚落和掠奪者前哨站的差別具體而微。舉例來說,你能帶著掠奪者去搶其他殖民 地,趕走義勇軍的勢力,並讓其他聚落臣屬於你。此外,被佔據和脅迫的聚落會對獨活者位於Nuka-World的基地獻上貢金。但在Power Play之後,任何被你背叛的掠奪者團體以及他們控制的前哨站都不會再聽從於你,並開始Cleaning House,獨活者要在這任務中摧毀敵人的前哨站。不過你不能快速移動到這些前哨站,必須要用兩條腿走過去宰了那些掠奪者。 要建立一個掠奪者前哨站,你要跟Shank講話,並選擇搶一個新的前哨站或威脅一個殖民地對附近的前哨站提供補給,這兩個工作都能以暴力或威脅達成。選擇暴力的話,三個團體會挑人出來和獨活者一起把該地的居民和義勇軍/槍手的援軍殺光或打殘。如果聚落中存在有名子的非隨機NPC居民,就能以威脅方式來脅迫或賄賂居民。
要注意,只要建立一個掠奪者前哨站,就會把義勇軍首領普雷斯頓·加維對你的關係降到最低,不論他是否在那個前哨站。因此最好在進攻想要的聚落之前先把他弄走,或在成為義勇軍將軍之前先成為Nuka-World的老大。 不可能也沒必要在掠奪者前哨站之間建立補給線,因為他們會自動連接。也不可能在前哨站和一般聚落之間建立補給線,你需要替前哨站張羅自己的資源。
要把掠奪者前哨站變回義勇軍聚落的話,你需要把該處所有掠奪者都殺光。該地的砲塔 會跟掠奪者一起對妳敵對。警告,一旦某處所有掠奪者都被殺光,獨活者就會被Nuka-World的所有掠奪者當作敵人,失去所有前哨站的控制權並,所有未完成的Nuka-World掠奪者相關任務也都會失敗,並開始狩猎季节。獨活者在這個任務中要殺死Nuka-World掠奪者團體的領導者(Nisha, Mags Black, William Black, and Mason) ,以終結對美国核子城貿易者的奴役。
任務[]
玩家一樣能在聚落接到各種任務。[1]
要素和需求[]
這些要素能控制聚落的發展,某個要素也會是其他要素的需求,比方說:人口需要水、食物和防禦以習得繁衍的真義。
人口[]
- 聚落的居民。人口用來採集資源和配置在獨活者造的建物上,每個聚落預設的最大人口數為「10 + 玩家魅力數值」,基本最大值為21(魅力10 + 魅力搖頭娃娃1),衣著和輔助品的加成另計。你要蓋招募塔吸引更多人,也能把同伴送往聚落,並招募某些不能成為同伴的角色加入。你也能要居民遷往你控制的其他聚落。
- 補給員算在他們出發的聚落人口。
- 人口越多、幸福度越低,招募塔招人的時間越長。
- 超過四個居民沒工作或都去當補給員的話,該聚落就招不到人。
- 需要:水、食物、床、防禦、招募塔。
食物[]
- 聚落生產的食物數量,因放置的食物資源而增加。
- 每個食物資源在自己獨立的每24小時後,能被玩家手動採摘。每個有農夫負責的食物資源
會生產一單位的同食物,並加入該聚落的工房。
- 任何工房有超過10單位食物(包括聚落無法生產的,像肉、軟糖等等)的聚落就不會
再增加食物庫存,每多一個居民該上限+1。
- 需要:人口、水。作物沒水會死。
水[]
- 聚落能生產的水數量。
- 每24小時,每個人口大於零的聚落會根據產水數值生產同數量的淨水,並自動存在工房。
- 任何工房有超過5單位飲水(包括聚落無法生產的,像髒水、酒精等等)聚落就不會
再增加水庫存,每多四個居民該上限+1。
- 生存模式中,玩家可以用產出的淨水解渴並裝滿水壺。
- 需要:電力(淨水器)(手摇泵不需要)。
電力[]
- 聚落能用的電力,用在防衛塔、陷阱、光源和某些建物(電視之類)。
- 發電機是攻擊的首要目標,記得修好他。
- 需要:無。
防禦[]
- 聚落現有防衛力量。該數值指能夠過工房建物增加,就算你放地雷來防備攻擊,它們也不會幫妳加防禦值。某些能用籠子(廢土工作坊新增)抓補的生物也能增加防禦值,像死亡爪和妖怪。
- 每點防禦值降低1%受攻擊機率。
- 每個人口額外降低0.5%受攻擊機率, in addition to any other defensive value the settler provides.
- 每點食物和飲水產值增加0.1%受攻擊機率。
- 每個存放在聚落工房的可食用和/或可引用物品增加0.1%受攻擊機率。
- 不論防禦值如何,每個聚落每天最低受攻擊機率為2%,最大值未知但假設是100%。一個聚落受攻擊後,遊戲內七天內不會再受到攻擊。
- 需要:人、電力(特定防衛塔和陷阱)。
防禦值跟實際防衛效率沒有正相關,一個Mk.5機槍塔殺敵效率比Mk.1重機槍塔快多了,但帳面防禦值卻少3。
床位[]
- 聚落內的床數量。每個居民都要一張床才不會不開心。
- 居民一抵達聚落、或床一做好,就會自動認領床位。如果床位不夠的話,有人就可能分不到床,這樣在床位夠了之後可能要跟他講去睡哪張床。
- 有些聚落裡原本就有床。其中某些像阿柏納西農場、十松崖和聖約村的居民需要玩家手動指引,其他像陽光訊息合作社則運作正常。有問題的聚落可能還是會顯示床位足夠,但居民還是會抱怨沒床睡,並反應在幸福度減益上。
- 就算是原本就沒床的聚落,在居民沒抱怨的情況下幸福度還是可能會被扣,這也是因為他們笨到不會自己找床睡。手動指引躺床是確保沒有隱藏幸福度減益的好辦法。
- 分解/無效化/忽略聚落中所有已存在的床並在該地弄新床可能可以避免這個問題。在電腦版中要把床無效化的方法是:開啟控制台、點已存在的床、輸入disable、離開控制台並做新床。這方法對不給躺的床也有效,不然就是要額外把床補足。
- 快速辨認沒床睡的居民的方法,是自己睡或等到午夜,此時除了守衛和補給員以外的人都會睡覺,醒著的就沒床睡。
- 在有這類問題的地點派工作給居民可能會讓他們忘記自己睡哪張床,所以記得重新安排他們的床位。
- 需要:無。
幸福度[]
- 這是聚落的士氣。提高聚落的幸福度能提高居民的生產力,不快樂的聚落可能會失去控制。
- 幸福度的計算方式是把所有來源的幸福度加總後除以人口數。
- 基本需求
- 每個人类居民能在滿足基本需求時提供最高80點幸福度:
- 有床睡+10
- 床上方有東西遮雨+10
- 食物產量>=人口數+20
- 水產量>=人口數+20
- 防禦數值>=人口數+20
- 每個非人類居民提供50幸福度。
- 守衛和補給員雖然用不到床,但還是要給他們一張。
- 聚落生產的食物和水只有在比人口多的時候才會增加幸福度。不管是自產還是透過補給線,如果無法提供足夠的食物和水,就會拉低個體居民的幸福度上限、拖累整體聚落的平均幸福度,且無法透過額外幸福度彌補。
- 防禦值比人口多並不會額外提高幸福度,但能降低聚落被攻擊的機率。
- 裝飾和聲音不影響幸福度。
- 額外幸福度
- 額外幸福度會平均分配給每個居民,如果額外幸福度為10,聚落有5個居民,那每個居
民幸福度+2。
- 下方表格列出特定店家提供的額外幸福度。
| 類型 | Tier 1 | Tier 2 | Tier 3 |
|---|---|---|---|
| 食物和飲水 | 15 | 20 | 40 |
| 診所 | 10 | 20 | 30 |
| 衣物 | 8 | 10 | 10 |
| 一般貿易 | 10 | 10 | 15 |
- 下方表格列出住在聚落的特定動物提供的幸福度。
| 類型 | 幸福度 |
|---|---|
| Junkyard dog | 10 |
| Cat | 10 |
| Gorilla | 20 |
- 下方表格列出避難所科技工房物品提供的幸福度。
| 物品 | 幸福度 | 備註 |
|---|---|---|
| Vault 88 overseer's desk | 10 | 只能蓋在88號避難所 |
| Pommel horse | 2 | |
| Weight bench | 2 | |
| Barber chair | 5 | |
| Soda fountain / Prototype | 5 | 只能蓋在88號避難所 |
| Soda fountain / Mood enhancement | 15 | |
| Soda fountain / Appetite suppressant | 5 | 能殺死居民 |
| Soda fountain / Caffeinated | 5 | |
| Phoropter / Prototype | 5 | 只能蓋在88號避難所 |
| Phoropter / Subliminal messaging | 15 | 能殺死居民 |
| Phoropter / Vault monitoring | 5 | 能殺死居民 |
| Phoropter / Eye care | 10 | |
| Slot machine / Prototype | 10 | 只能蓋在88號避難所 |
| Slot machine / Profiling | 5 | |
| Slot machine / Lost revenue | 15 |
- 幸福度上限
- 居民幸福度有其上限,因無法滿足基本需求而喪失的幸福度無法透過額外幸福度彌補。
- 聚落的防禦值比人口少的話,居民幸福度上限為60。
- 聚落每24小時會更新一次,每個居民會從工房消耗一個食物和一個飲品。如果聚落有跟其他聚落用補給線連接,那有需要的話會從其他聚落的工房扣除。得不到必要食物/飲水的居民的幸福度上限為30,直到下次更新。存放在其他容器而非工房的食物和飲水不會被消耗,也無法維持居民幸福度。
- 一個居民沒有「上方有遮蔽的床」的話,幸福度上限為60。
- 臨時幸福度調整
- 每個聚落的幸福度都受到一個臨時調整數值影響,調整範圍在-50到+20之間。每24小時的更新會讓這數值*0.8,直到下次有額外要素觸發臨時調整。最常見的是居民死亡導致幸福度-20,其他觸發事件包括觸發義勇軍任務(-20)以及完成任務(+20)。
容積[]
- 顯示玩家所在聚落目前放了多少東西,以及該地最大可放東西數量。每個已存在或玩家
建造的物件會消耗掉聚落容積,如果容積達到上限,就需要分解掉其他物件以放新物件。
- 你能把物件丟到地上並手動分解/存放它們,以規避遊戲中聚落的容積限制。每個被分解的物品會釋放一小部份容積量,能蓋更多東西。在聚落放大量的物件可能會導致掉偵和lag。
- 需要:無。
點出Local Leader後,食物、飲水、垃圾資源就能透過補給線在聚落間共享,能讓玩家 更快建設或甚至特化新聚落。
聚落受攻擊機率[]
機率算法如下:
基本=(食物+水)/2
降低=(人口/2)+防禦
機率=max(基本%-降低%, 2%)
最低受攻擊機率為2%。
算法中的食物和水还包括工作台中的储存,这意味着随着时间的推移,对于生产过剩的定居点,攻击机会可能会增加。
舉例[]
如果一個聚落有5食物、6飲水、2防禦和5人口,受攻擊機率算法為:
基本=(5+6)=5.5
降低=(5/2)+2=4.5
機率=max(5.5%-4.5%,2%)=2%
備註[]
- 一個聚落內有超過四人沒工作的話,就不會有新人抵達。居民包括類人生物和婆羅門,但不包含補給員。婆羅門會出產肥料,使耕地變更肥沃;居民沒工作不會影響幸福度;機器人的個人幸福度不會超過50;當工房內物品數量達到(一個很大的)上限後,生產會停止。
- 最大的水資源產地為Spectacle Island,能生產超過10000單位的水。Castle大約2500-4000,庇護山丘則是3200。
- 除了屍鬼聚落the Slog以外,一般聚落也可能會招到屍鬼居民。他們就跟一般人一樣過來,也可能會變成合成人。
- 跟同伴不一樣,居民不消耗彈藥,只要帶著很少的彈藥就能用你給他們的武器。這代表你
能給居民非常先進和/或很吃子彈的武器,像機槍、火焰噴射器或電漿武器,只要確保他們身上的彈藥能讓他們至少「射一槍」。像機槍之類的武器每輪行動都會消耗一定量的彈藥,那帶這些武器的居民身上也要有該數量的彈藥。這機制也適用手榴彈,但不適用火箭筒和胖子發射器,因為這類武器被設定為「NPC會消耗彈藥」。此例外的例外是機器人,他們內建的火箭和胖子發射器(Automatron DLC)是無限彈藥的。
- 過量的水和作物會放在工房中。工業級淨水器能產出大量的水,能替聚落帶來大量的瓶蓋,特別是跟貿易設施結合在一起的時候。作物也會存進工房,但自己用手摘快多了。
- 遊戲內每24小時(現實世界8分鐘),作物和水都會存入工房。玩家所作所為不影響時間。
- 淨水在工房內不會以堆疊方式儲存。假設有一疊200單位的淨水在工房內,那就不會有新的淨水存進去,直到這疊淨水被移除。不過作物不管怎樣都會長出來。
- 聚落人口上限受玩家魅力影響。預設上限為10,每點魅力+1,意思是魅力10的角色轄下聚落人口基本上限為20。透過某些特殊物品、衣著和食品的加成能讓上限最高提高到43。
- 有方法可以騙過聚落容積限制:把不想要的武器扔到地上並分解/儲存,就能降低現有容積量,幅度根據物品複雜程度而定,有一堆配件的武器效果最佳。這原理是因為遊戲認定這些物件都是聚落物件的一部分(像是地上可分解的草蓆),因此分解它們會減少容積量。由於這可能是bug,小心使用過度會出問題。
- 在工房界面,玩家能分解某些靜態物件,像是廢車、燈柱、信箱、馬桶等。如果分解一個容器,內容物都會被加進工房,就算那是個上鎖的保險箱也一樣。
- 你能在工房界面指定居民去特定建物,像是貿易站、步哨和作物。你也能要他們移動到某處、搬到別的聚落、或建立補給線。
- 你能透過補給線在聚落間共享資源,不管是鐵/木頭這種垃圾,還是甜瓜/變種果等作物。
- 說明:食物和飲水用來餵居民、垃圾則用來建造。補給線分享適用於任何這類物品,甚至包括武器/護甲/機器人(需要Automatron DLC)模組-你能在A聚落放一個短城雷射瞄準鏡進工房,並在與之相連的B聚落中的武器台改造雷射槍時裝上去。不過這並非直接性分
享,你能遠端消耗A聚落的淨水以在B聚落做一個蔬菜澱粉,但不能直接從B聚落把該淨水拉出來放在自己的包包裡。總之補給線系統意味著你能用少數聚落負責食物和的生產,其他聚落負責垃圾回收、貿易、武器或其他。
- 拾荒工作台能用來收集稀有資源,像混凝土、盒子材料、橡膠、軟木等。會得到什麼資源是隨機的,玩家需要指定一個居民去工作。
- 一個負責採收食物的居民最多能生產六單位的食物,也就是12棵產量0.5的作物或六棵變種果樹。
- 一個負責守衛的居民最多能負責三個步哨(總共最多6防禦)。
- 陷阱(特斯拉弧、輻射發散器、噴火陷阱等)需要電力,一接通就會立刻啟動。他們能連在交換器上,並透過手動觸發、或以雷射陷阱線或壓力版來自動觸發。預設上任何生物都能自動觸發陷阱,如果有台終端機連接這些開關就能調整成只受到惡意生物觸發。陷阱在觸發後需要修理。
- 蓋酒吧會讓居民在傍晚去喝一杯,吧台旁邊有椅子的話他們會坐在那邊喝。
- 在完成碉堡山任務串後,你能開始收到從該處派來的商隊。在工房->資源->雜項會有相關建物。
- 居民不會辨別商店是否有營業,他們常常會在酒吧或店家前排隊,儘管根本沒人服務。
- 有時雖然電力明明很充足,卻在工房界面變成紅色,那是因為有發電機壞了需要修理,或者有需要電力的物品沒接到電源。
- 有些居民可能是合成人,有他們在的聚落會導致學院的攻擊。這些人也可能會表明身份或被抓包,並變成敵對狀態—通常馬上就被其他居民給宰了。
- 居民會消耗食物和飲水,多的會透過補給線跟其他聚落共享,代表能靠一個聚落餵飽很多聚落。
- 盡量把砲塔蓋在高處或者碰不到的地點,像是庇護山丘大橋兩邊的牆上或者屋頂。如果當下沒這種地點,也可以蓋個高架的棚屋結構並把砲塔蓋在上面。這樣砲塔會有更好的視野和火力範圍,且能避免近身攻擊和爆裂物的濺射傷害,只要確定蓋的位置能讓你修理就好。高架棚屋能蓋在彼此的頂端,再用隨意做的梯子繞在旁邊,蓋個兩層就有差不多20呎高,放在村莊中心差不多就能殲滅所有進入聚落視野的敵人(更別提每層都能放砲塔, if opted for the wooden foundations over the concrete model)。這個策略讓玩家不用在整個聚落四周佈下天羅地網,而只要專注在一兩個點放炮打,因為入侵者常常會在聚落附近或甚至內部出現。
- 你也能把高架棚屋移除掉並讓砲塔「漂浮」在半空中,這能讓砲塔擁有360度的視野,只要確保你修的到就好。就算重開遊戲,砲塔仍然會保持浮空。
- 如果被叫去防衛聚落,抵達時卻沒看到任何敵人,這通常代表攻擊者接近但還沒抵達聚落,隨時會發起戰鬥。巡視並檢查四周,但別離開聚落邊界以防突襲。在这种情况下,防御事件可能无法成功,因为不再有攻击者可杀,任务目标无法完成。
- 當觸發聚落戰鬥(且出現任務目標),但玩家離目標聚落很遠,該聚落有一定機率不靠玩家參與而防禦成功並完成任務目標。機率計算方式為比較防禦力量(防禦值 + 人口) + 一個1到100的隨機數字和攻擊力量((食物+飲水)+/-50%) + 一個1到100的隨機數字。防禦力量上限為100,所以在沒攻擊時把防禦值弄高於「100-人口」是沒用的。食物+飲水和攻擊力量的上限也是100,所以最大攻擊力量為50或100(100+/-50% = 50或150,上限100)。在加上隨機數字後,總攻擊值上限為150,總防禦值則為200。這代表防禦越高越可能贏,但戰鬥發生在「富饒」的聚落時,就算有最高防禦也有大概1/3機率會輸掉。
- 因此,要在遠離聚落的情況下最大化防衛勝利機率(且不犧牲幸福度),聚落防禦值應該要不小於「100-人口」,且應該要只有正好跟人口相當的食物和飲水。舉例來說,一個聚落有13人口,那至少要87防禦值、正好13食物和飲水。
- 底下是用Bethesda的演算法算出來的聚落攻擊方勝率(sample of 10M simulated attacks for each case):
| 食物+飲水 | 防禦+人口 | 攻方勝率(%) |
|---|---|---|
| 0 | 1 | 48.5 |
| 0 | 25 | 27.7 |
| 0 | 50 | 12.2 |
| 0 | 75 | 3.0 |
| 0 | 100+ | 0 |
| 50 | 1 | 85.7 |
| 50 | 25 | 70.4 |
| 50 | 50 | 49.5 |
| 50 | 75 | 28.3 |
| 50 | 100+ | 12.8 |
| 100+ | 1 | 97.7 |
| 100+ | 25 | 91.4 |
| 100+ | 50 | 78.4 |
| 100+ | 75 | 53.7 |
| 100+ | 100+ | 30.6 |
- 聚落有馴養/籠中生物的話,會大幅增加受攻擊機率,且大部分攻擊都會由該生物種類組成。
- 機槍塔和重機槍塔有MK1/3/5/7四種等級,;炮塔的等级可以通过储存再放出来来更改。 可以在放置砲塔之前,先看他兩側的型號來得知。 砲塔上的彈桶顏色會根據等級變化,說明裝填的子彈類型,並以該型號子彈做出傷害。高階砲塔的傷害會更高,子彈也更強(像是燃燒彈或炸裂彈)。聚落造出的砲塔等級上限受到玩家等級(16等解鎖MK3、28等解鎖MK5、40等解鎖MK7)、距離庇護山丘距離、當地敵人等級三個要素影響。
- 覺得義勇軍任務太多的話,任務最後別回報Garvey就好,這樣就能中斷整個義勇軍
務計時器,而且不跟他講話還是能完成任務並拿到經驗值。但透過自由電台或聚落居民親自給予的任務不能這樣做,因為超過內建計時會導致任務失敗,聚落防衛任務同理。
- 每個聚落都有「更新計時器」,從解鎖該地工房開始,遊戲內每24小時會啟動一次。在某個聚落內開啟工房界面時,該地計時器會暫停,但整個遊戲時間和其他已解鎖聚落的計時器會繼續。當更新計時器走過24小時,會發生底下事情:
- 如果還沒達到各自上限,聚落的食物、飲水、垃圾和肥料產出會存進工房。
- 每個人類居民會消耗1單位食物和1單位飲水,不夠的部份會從與補給線相連且有剩餘的其他聚落消耗。如果整個補給網無法提供足夠飲食,在下次更新之前無法得到足夠飲食的
居民幸福度上限都只有30。
- 計算攻擊機率,並以一個隨機數字決定是否發生攻擊。
- 隨機事件觸發的臨時幸福度調整數值*0.8。
- 以上順序因不同聚落而異。
- 沒工作的居民每天會生產1單位垃圾,被派到拾荒工作台的居民每天生產2單位垃圾。每個聚落工房的垃圾儲存上限為100,每多一個人口+5。
- 婆羅門會提高隨機食物產量50%,上限為10。此外每3頭婆羅門每天會生產1單位肥料。工
房有超過10單位肥料的話就不會生產。
聚落預算(庇護山丘)[]
目標是規模20人(最少11人)的聚落。在蓋聚落的時候可以用一個中型發電機供給一個招募塔和兩個淨水器(蓋在一起)。一個居民可以生產6單位食物(6棵變種果樹或12個其他作物),所以四個居民可以生產24單位。沒事幹的居民可以去當守衛,一個守衛能負責三個步哨,七個居民可以負責21個。變種果可以從Greentop Nursery、Graygarden或Warwick homestead入手。
- 人口-招募塔*1
- 床位-睡袋*20
- 食物-變種果*20(需要4居民)
- 水-淨水器*2
- 電力-中型發電機*1
- 防禦-步哨*20(需要7居民)
最低花費
- 11居民(可支撐20人)
- 木頭*200
- 布料*64
- 鋼鐵*117
- 變種果*20
- 銅*18
- 塑膠*14
- 陶瓷*8
- 油*4
- 螺絲*3
- 齒輪*3
- 線圈*2
- 水晶*2
不然你也能改蓋7個抽水幫補:
- 鋼鐵*28
- 混凝土*7
- 齒輪*7
进阶聚落建设技术[]
可以通过一些手段可以利用游戏机制来建造一些常规途径无法做到的建设There are some ways to get around the clipping of settlement objects with each other and preexisting objects in the world to allow the player to build more sophisticated structures. These can all be done without mods however some will require using the game console. See Fallout 4 console commands for the full list of console commands.
Mat exploit[]
This by placing a small door mat down and then placing a larger item like a chair on top of it (This will not work with snappable objects). When you select the mat by tapping down the select button it will also pick up the items linked on top; however the collision will only be enabled for the floor mat (If you hold the select button it will use the collision of the thing you are trying to move), enabling you to potentially clip the larger object into other objects provided the mat isn't clipping with anything. To increase the distance that the mat can reach try stacking rugs with the base (the one you want to move with) at the bottom.
Note: This also works with wall decorations and conduits. (tested with vanilla wall decorations/signs).
Pillar exploit[]
This is achieved by using a concrete pillar (found in the Wasteland Workshop Add-on) and placing it next to a structure. By holding the "Place" button, the structure and pillar will be highlighted. If only the pillar is highlighted, move it closer to the structure. Doing this does not allow you to clip the structure but to sink it into the ground. If you don't have the Wasteland Workshop Add-on you can use concrete foundation.
Pillar and mat exploit combo[]
By using the two above exploits, you can clip and sink objects into the ground. In order to do this, use the mat exploit to get the object you want to do the glitch with. Then place the pillar down next to it, next hold down the select button and it will use the collision of the pillar and mat, not the object on top of the mat. This will allow you to clip and sink the object.
Electrical Connections without limits exploit[]
By starting with the cursor on the object you wish to connect an electrical wire from and slowly moving toward an already existing wire that bisects the object until the wire is highlighted, one can press the button associated with connecting a wire and hear the sparking sound. Going to another place the wire could connect to and pressing the connect wire button will place a wire that is not bound by object interference or distance. Once the wire is placed, one must exit using the previous menu button or anomalies may occur.
Infinite population exploit[]
With add-ons, the max population of most settlements can be increased indefinitely with tamed creatures from the Wasteland Workshop add-on, and with robots built from Robot workbenches in the Automatron add-on. Settlers that the Survivor meets in random encounters or during the Automatron add-on's radiant quest Rogue Robot can also be recruited and sent to any settlement of the player's choice in the Commonwealth, Nuka-World, or the Island (with the sole exception being Home Plate), ignoring the maximum population limit.
Console: TCL[]
The console command tcl will disable clipping to yourself. It will also turn off clipping for any objects you place down or select while in this mode, allowing you to put other objects inside of it. If you have an object placed that you want to put another object inside of you simply select that object then deselect it to disable its collision. You can then place down an object inside of it. Once you remove the collision you will also remove the ability to select that item. To restore collision simply enter tcl into the command again to reactivate clipping. You can enter tcl again to go back into tcl and begin removing collision again.
This command is best used for junk wall placement to allow you to join the sections of wall together.
Console: modpos[]
Modpos will allow you to move any object in the game that is selectable within the console. To target an object, simply click on it when you have the console open. Modpos will require you to specify an axis and also an amount to move an object by. Because you are forcing the object to be moved through console this will ignore all collision and will allow you to move the object anywhere you wish. Each unit of movement is quite small and you can get a high degree of accuracy.
Some sample distances:
- 1 full size floor object length = 256
- 1 full size floor object height = 15
- 1 upper shack floor object height = 22
- 1 wall height = 202
- Distance between floors (Z axis), non-prefab, using the standard 1 full square stair set = 224
Console: setpos[]
While Modpos moves a selected object a given distance, Setpos moves it to specified x, y, or z coordinates. Both ignore any clipping including with the original environment. Setpos is most useful when dealing with an item that snaps to another and the game will preview the object in the correct position but will not place it there. For example, you can get the coordinates of a wall while it is in the preview location, then place it on the other side of the floor in an allowed location, then use Setpos to move it back to the preview location already placed.
To use it, open the console while the object is snapped into the preview position. Click on the object and get its x, y and z coordinates in that location with:
- getpos x
- getpos y
- getpos z
Close the console. Now place the object elsewhere in the same orientation, parallel to the final destination. With the object placed, open the console again, and with the object still selected use the following, replacing # with the number shown by Getpos for that axis.
- setpos x #
- setpos y #
- setpos z #
If you need to scroll back up in the console to get the coordinate, the PageUp and PageDown buttons may be used.
Note: Fallout 4 uses the "Left-hand" coordinate system, where X is East/West, Y is N/S, and Z plus is up (world coords).
Console: Building all objects at internal workshops[]
It is possible to build all settlement objects at certain internal workshops which limit the items one can build, such as Home Plate and The Mechanist's lair, by opening the console, clicking on the offending workbench so that its reference is displayed and then entering addkeyword 5A0C8 and addkeyword 246F85.
Unlimited size[]
When you're building big settlements, often you are confronted with a full-size bar. This means that, according to the game mechanics, you can't place another item in your settlement. A quick workaround can help you to easily reduce your settlement size, which enables you to place more items.
- Place the weapons in the workbench
- Remove the weapons from the workbench
- Drop the weapons on the ground
- Enter workshop-mode
- Click on the weapons and store them in the workshop
Doing this will reduce your settlement size, and enables you to build bigger settlements.
With the Contraptions Workshop add-on, vacuum hoppers can be used to automatically drop weapons from the workshop inventory onto the ground.
Alternatively, on PC, it is possible to increase the build limit using console commands. The build limit is calculated using two actor values: triangles and draws. The following commands can be used to change these values:
- getav 348 displays the current number of triangles
- getav 349 displays the maximum number of triangles
- setav 349 <amount> changes the maximum number of triangles to the specified amount
- getav 34a displays the current number of draws
- getav 34b displays the maximum number of draws
- setav 34b <amount> changes the maximum number of draws to the specified amount
Using an amount of -1 disables the limits entirely.
Moving build structures[]
Objects that are joined into the full structure can be moved as one object. Example: If you have built a shack on one end of a settlement (walls and floors with lamps, desk etc.) you can move it as one item. In build mode, you hold your select button ('e' for PC) on one element (preferably you choose wall from outside) and the whole structure will be selected. Now you can move your shack on the other side of your settlement.
Bugs[]
- When away from a settlement, the Pip-Boy's workshop section on the data screen may show incorrect values for a settlement's statistics, such as water and beds. This occurs when the player character enters an exterior cell close enough to a settlement such that only a subset of the settlement's exterior cells are loaded into the simulation engine. The result is that only those objects in the loaded cells are included in the statistics. Unfortunately, the settlement will experience the expected negative consequences of this, such as the happiness score dropping, and settlers may become unassigned from their beds. The effect will be more noticeable in larger settlements, such as Sanctuary Hills, which are composed of a larger number of exterior cells, and in the case of Spectacle Island, this can occur without even leaving the island. It will not affect settlements which only consist of a single cell, such as County crossing.[已验证]
This is a fundamental limitation of the simulation engine, so there are no methods to permanently prevent this from occurring, though several workarounds and temporary fixes exist:- Returning to the affected settlement and opening the workshop should correct the statistics. In the case of Spectacle Island, you may have to travel to the center of the island to ensure all the cells have loaded.
- Replacing all pre-existing beds in a settlement may prevent settlers from becoming unassigned from or not assigning themselves to these beds. On PC, if scrapping is not possible, selecting the bed to be removed in the console and using commands disable and then markfordelete will permanently remove the selected beds.
- One can fix this by group selecting preexisting beds and moving them onto a floor. Scrapping or storing the floor will then delete the bugged bed. This feature is disabled after 1.6 patch.
- Manually assigning all settlers to a bed using the command option in the workshop menu may prevent settlers from becoming unassigned from their beds.
- If a distress pulser is dropped on the ground in a settlement and then scrapped using the building screen it will permanently emit a distress signal.[已验证]
- After choosing 'barter' at a user-created settlement shop, the trade window may open to two blank lists (player character and settler inventories are empty), where the settler has 0-6 caps and nothing can be done except exiting.[已验证]
- Exiting the trade menu, selecting the 'all items' category in the Pip-Boy and then retrying barter may resolve this bug.
- Settlers with a coded routine may continue it at the expense of an assigned job. This occurs mainly with original settlers from before a settlement is unlocked, and some named settlers. Examples include Sturges or Marcy Long rarely being present at a store if assigned (though still bartering from wherever they are), robots at Graygarden tending plants regardless of assignment, and original settlers in Greentop Nursery assigned to guard posts spending time sitting in chairs inside the house, while new settlers assigned the same roles do not. For assignments like guard duty where being in the correct location matters, a new settler may be a better choice.[已验证]
- When fast traveling to a settlement, settlers may be seen standing on the roofs of natural or player character-built structures with no way of getting to the top of them.[已验证]
- Fast-traveling to the settlement again should make them return to the ground.
- Beds that are under cover (even in an entirely enclosed building) may not be recognized as such, impacting settlement happiness.[已验证]
- If a switch or generator is stored or scrapped when the wire is being pulled out, sparks may remain hovering and cannot be removed.[已验证]
- Settlers assigned to stores (except clinic) placed above the water at Nordhagen beach, refuse to engage in dialogue. [已验证]
- Simply moving those emporiums away from the water and placing them on a dry surface resolves this.
- Sometimes if you re-assign a settler from food production to a new task, all other settlers doing food production stop working on food, and food production drops to zero. [已验证]
- Normally when assigning a settler to a crop plant, fallout will automatically assign the settler to any other untended plants at the settlement. Sometimes this does not happen, and only the individual plant is assigned. Restarting Fallout (not reloading the current game) will fix this.