| For housing in Fallout 4, see Fallout 4 player housing. |
|
In Fallout 4, the Sole Survivor can build and manage their own settlements at various sites around the Commonwealth. The new workshop interface is used to place and connect pre-fabricated structures as well as individual pieces (walls, floors, roofs, etc.) letting the player character construct their own home base(s) as they desire.
Once built, these settlements can be customized extensively. Inside buildings and structures, furniture, decorations, and lights can be placed for aesthetic purposes; outside these structures, the player character can plant crops, create water and power supplies, and tend to the defensive needs of their new settlement. To accumulate resources for their settlements, the player character can scrap most interactive inventory items.
Once a settlement reaches a certain size and/or the player character obtains necessary perks, they can invite others to set up shop at their base by building unique resources such as the trading post, which adds a vendor NPC stocking some of the best in-game items. It is also possible to establish supply lines between settlements to share resources and inventory among them.
Settlements require constant maintenance with NPCs tending to more basic functions such as crop harvesting. However, without this, crops will fail and equipment will need repair over time. The player character will have to use the workshop and have the required junk to complete the repairs. Walking up to a damaged or failed item while in workshop mode, the player character will be offered a selection to scrap/repair the observed item.
Most of these sites can be obtained during the Minutemen quests; however, others will require visiting them and completing location-specific quests.
Settlement sites

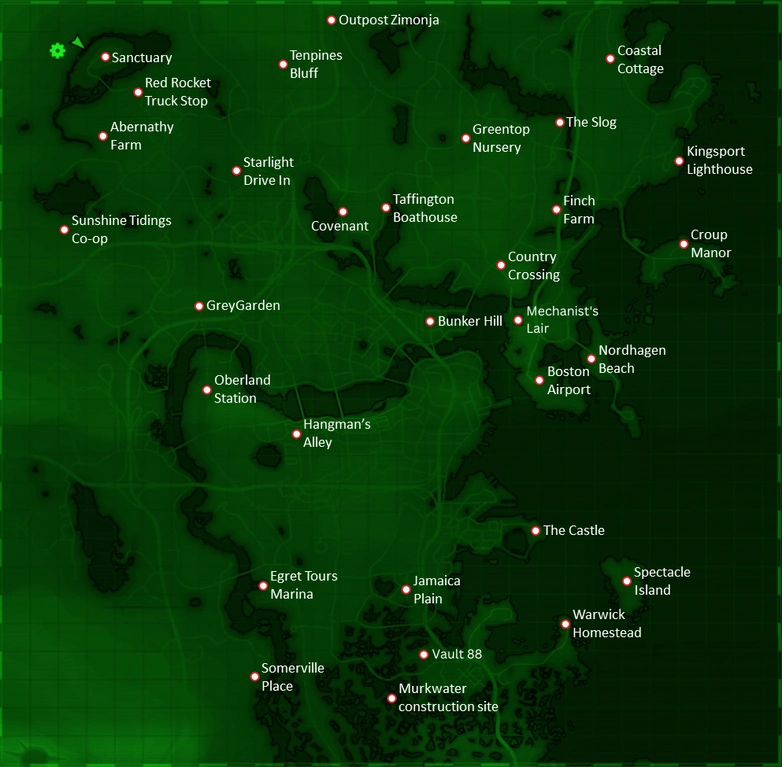
All possible settlements in the base game with the exception of Home Plate which lacks most settlement options, excluding add-ons
There are 35 discoverable/unlockable settlements total with 30 in the base game, 1 in the Automatron DLC, 4 in Far Harbor; most are obtained by completing an objective or killing hostiles/residents in the area then opening the workshop. Those include:
| Location | How to obtain control | Crafts | Notes | Workbench RefID |
|---|---|---|---|---|
| Abernathy farm | Complete Returning the Favor, drive the Abernathys away or kill the Abernathys. | 0006F5C5 | ||
| Boston Airport | Complete Shadow of Steel, Rockets' Red Glare, Airship Down, or With Our Powers Combined. To use the workshop after destroying The Prydwen, clear the airport ruins of ghouls. You may complete Duty or Dishonor before destroying The Prydwen to skip this. | Food cannot be grown at this location. The workshop can be used to place other stations. | 000B3506 | |
| Bunker Hill | Talk to Kessler after completing The Battle of Bunker Hill. | |||
| The Castle | Complete Taking Independence or eliminate the resident mirelurks. | These crafting stations are available once the quest Old Guns is completed. | ||
| Coastal Cottage | Eliminate the resident mirelurks. | Can be used as a Railroad safehouse. | ||
| County Crossing | Complete a Minutemen quest or kill the current settlers. | |||
| Covenant | Side with Covenant during Human Error and speak to Jacob Orden, or kill the current settlers. | |||
| Croup Manor | Eliminate the resident ghouls. | Can be used as a Railroad safehouse. | ||
| Egret Tours Marina | See the guide to obtain as a settlement. | |||
| Finch Farm | Complete Out of the Fire or kill the current settlers. | |||
| Graygarden | Complete Troubled Waters or kill the resident robots. | |||
| Greentop Nursery | Complete a Minutemen quest. | |||
| Hangman's Alley | Eliminate the resident raiders. | Can be used as a Railroad safehouse. | ||
| Home Plate | Buy the key from Geneva at the Mayor's Office in Diamond City for 2000 caps. | Despite limited building options no other settlement options are available. Also cannot be added to a supply line | ||
| Jamaica Plain | Eliminate the resident ghouls. | Can be used as a Railroad safehouse. | ||
| Kingsport Lighthouse | Eliminate the resident Children of the Atom worshippers. | Can be used as a Railroad safehouse. | ||
| Murkwater construction site | Eliminate the resident mirelurks. | Can be used as a Railroad safehouse. | ||
| Nordhagen Beach | Complete a Minutemen quest. | |||
| Oberland Station | Complete a Minutemen quest. | 0009B1D1 | ||
| Outpost Zimonja | Eliminate the resident raiders. | Can be used as a Railroad safehouse. | ||
| Red Rocket Truck Stop | Always available. | Can be used as a Railroad safehouse. | 00054BAE | |
| Sanctuary Hills | Always available. | 000250FE | ||
| The Slog | Complete a Minutemen quest. | |||
| Somerville Place | Complete a Minutemen quest. | |||
| Spectacle Island | See the guide to obtain Spectacle Island as a settlement. | Has the biggest build area of all settlements. Can be used as a Railroad safehouse. | ||
| Starlight Drive-In | Eliminate the resident mole rats. | Can be used as a Railroad safehouse. | 0001D0E2 | |
| Sunshine Tidings Co-op | Eliminate the resident ghouls. | Can be used as a Railroad safehouse. | 001654D5 | |
| Taffington Boathouse | Eliminate the resident bloodbugs. | Can be used as a Railroad safehouse. | ||
| Tenpines Bluff | Complete The First Step, or kill the resident settlers and fail The First Step. | 0009B1AC | ||
| Warwick Homestead | Complete Building a Better Crop or complete a Minutemen quest. | |||
| The Mechanist's lair |
Complete Restoring Order for the Automatron DLC. | Robot workbench | Food cannot be grown at this location. | |
| Longfellow's cabin |
Complete Walk in the Park for the Far Harbor DLC. | |||
| Dalton Farm |
||||
| National Park Visitor's Center
|
||||
| Echo Lake Lumber |
Legend:
![]() Armor workbench
Armor workbench ![]() Chemistry station
Chemistry station ![]() Weapons workbench
Weapons workbench ![]() Power armor station
Power armor station ![]() Cooking station
Cooking station
Necessities and dependencies
These stats need to be maintained to sustain or stagnate the growth of a settlement. Each necessity would also act as a dependency on other necessities; i.e. people need water, food, beds and protection to live long and prosper.
People
- The population of the settlement. People are required to collect from resource units and man objects the Sole Survivor builds. Each settlement has a default max population of 10 settlers plus each point of Charisma the character has, which has a base max of 21 before factoring in extra charisma from armor and consumables (the theoretical limit could be much higher once power armor charisma increases are calculated). A radio beacon is generally required to attract more settlers, but one can send companions to settlements and can recruit a few non-companion characters to join the settlements as well.
- Note that increasing populations and lower happiness scores will increase the time for new settlers to arrive using the radio beacon.
- Dependencies: water, food, beds, defense, radio beacon
Food
- How much food the settlement is producing. Increased by placing food resources.
- Dependencies: people, water. Crops will die without water.
Water
- How much water the settlement has.
- Dependencies: power (only with water purifiers)
Power
- How much power is available for the settlement to use. Power required for turrets, traps, lights and some furniture (TV).
- Repair Generators after attacks, they are a main target
- Dependencies: n/a
Defense
- Measures how defendable the settlement is, based on traps, guard posts and turrets one has. Advisable to have a defense rating at least the sum of the food and water ratings. These defenses will have to be repaired from time to time.
- Dependencies: people, power (with certain turrets and traps)
(Note that the defense values do not directly correlate with actual combat efficiency. A Mk. 5 machine gun turret can kill enemies several times faster than a Mk. 1 heavy machine gun turret, but will contribute less to the settlement defense value)
Beds
- The number of beds in the settlement. The settlement needs one bed per settler to keep the settlers happy.
- Settlers normally assign themselves to available beds automatically upon arrival or as beds are built. It is possible that settlers will not assign themselves to a bed unless the total needs for all settlers are met. After additional beds are built, it may be necessary to manually assign all settlers to individual beds.
- In some settlements with preexisting beds, such as Abernathy Farm, Tenpines Bluff, and Covenant, settlers often require manual bed assignments. Others such as Sunshine Tidings Co-op work automatically. Problem settlements may show a proper amount of beds in the building overlay, but settlers may comment on the bed situation and settlement happiness WILL be negatively affected.
- Even in settlements which do not start with pre-existing beds, it is possible for happiness to suffer without settlers complaining simply because they have not automatically assigned themselves to beds. Manually assigning beds to ensure each settler has a bed is a good way to ensure there are no hidden negatives dragging down happiness.
- Scrapping/disabling/ignoring all preexisting beds in a settlement and building new ones in their place may help avoid this problem from the start. To disable a bed on PC, enter the console, click on the preexisting bed, type disable, then exit the console and build a new bed in its place. This can also be done to a bed that will not accept manual assignments. Otherwise, building additional beds equal to the preexisting ones may be required.
- To quickly identify all settlers without a bed, sleep or wait until midnight when settlers other than guards and provisioners will go to bed. Any others left awake require manual assignment.
- Assigning a job to a settler in a problem location may cause his bed assignment to be lost, so assign jobs before manually assigning beds.
- To achieve max happiness at The Slog it is necessary to reassign NPCs sleeping in preexisting beds on the south wall (Wiseman, Deirdre, Holly, Jones (Fallout 4), and one unnamed worker) because their beds are located under operating shower heads (Arlen Glass has a reminder on his computer to fix the plumbing). This requires adding new beds not positioned against a wall with shower heads and then reassigning the NPCs to these new dry beds. Note that Holly and Jones (Fallout 4) need closely adjacent beds or they won't readily occupy the the beds even after being assigned.
- Dependencies: n/a
Happiness
- This is the morale of the settlement. Increasing a settlement's happiness will increase the productivity of its settlers. One may lose control of a settlement that is very unhappy.
- The displayed happiness value is calculated by adding together all happiness points, and dividing by the total population.
- Basic needs
- Each human settler can provide up to 80 happiness points by meeting their basic needs, which are:
- A bed in which to sleep, which counts for 10 points.
- For their bed to be covered from rainfall, which counts for 10 points.
- One unit of food per day, which counts for 20 points.
- One unit of water per day, which counts for 20 points.
- One unit of defense per settler, which counts for 20 points.
- Each non-human settler instead provides 50 happiness points at all times.
- Guards and provisioners will not use their beds, but must still be allocated one.
- The food and water can either be produced in the settlement, or can be supplied from another settlement via a supply line. Either method produces the same amount of happiness.
- Providing more than one unit of defense per settler will not provide any more happiness, but will reduce the chance of the settlement being attacked.
- Contrary to popular belief, decoration and noise levels have no effect on happiness.
- Bonus happiness
The table below lists the happiness points provided by the presence of certain stores, and are marked with a happiness icon in the tooltip when building them.
| Type | Tier 1 | Tier 2 | Tier 3 |
|---|---|---|---|
| Food and drink | 15 | 20 | 40 |
| Clinic | 10 | 20 | 30 |
| Clothing | 8 | 10 | 10 |
| General trader | 10 | 10 | 15 |
The table below lists the happiness points provided by certain animals living in a settlement.
| Type | Happiness |
|---|---|
| Junkyard dog | 10 |
| Cat | 10 |
| Gorilla | 20 |
Size
- Shows the amount of objects that have been placed by the player character within the settlement, as well as the maximum amount of objects that can be placed through the Settlement interface. Every item existing or that you build takes up settlement size. If your settlement is built out/ full and you want to add on something, you need to take down a few mailboxes, light poles, trees etc.
- It is possible to bypass the in game size limit of settlements by dropping junk items to the ground and scrapping them manually. Each scrapped items refunds a small amount of allotment points allowing you to build more objects. Be warned however, that depending on processing power, placing large amounts of objects in any settlement will cause a lot of frame rate issues and lag while in that settlement. It also works to just store the dropped items in the workshop. This can be done repeatedly by retrieving the items from the workshop, dropping, and storing them again.
- Dependencies: n/a
With the Local Leader perk, food/water and junk resources can be shared between settlements connected by a supply line allowing the player character to quickly build out new settlements or even specialize them.
Related perks
- Gun Nut allows for the creation of more advanced defenses.
- Hacker is required for the creation of Terminals.
- Armorer is required additionally to build Power Armor crafting stations.
- Science! is required for the creation of assorted advanced power-focused structures.
- Local Leader allows for two settlements to have a Supply Line, sharing resources.
- Rank 2 of the perk is required for vendor stalls and crafting stations.
- Cap Collector is an additional requirement for tier 3 shops.
- Medic is an additional requirement for all medical shops.
Constructible items
Unlockable settlement items
- Have a look here for further items: advanced settlement items.
Structures
| Material | Category | Name | Components | Base ID |
|---|---|---|---|---|
| Wood | Prefabs | Corner | 15x wood 12x steel |
???????? |
| Corner [extended] | 20x wood 15x steel |
???????? | ||
| Floor and roof | 10x wood 10x steel |
???????? | ||
| Floor and roof [slanted roof] | 10x wood 10x steel |
???????? | ||
| Hallway | 12x wood 10x steel |
???????? | ||
| Hallway end | 14x wood 10x steel |
???????? | ||
| Large shack | 40x wood 20x steel |
???????? | ||
| Small shack | 30x wood 20x steel |
???????? | ||
| Wall and roof | 12x wood 10x steel |
???????? | ||
| Wall and roof [extended] | 16x wood 10x steel |
???????? | ||
| Floors | Shack floor | 8x wood 2x steel |
???????? | |
| Shack floor [2] | 7x wood 2x steel |
???????? | ||
| Shack foundation | 12x wood 3x concrete |
???????? | ||
| Shack foundation [2] | 12x wood 3x concrete |
???????? | ||
| Shack stairwell | 12x wood 2x steel |
???????? | ||
| Shack upper floor | 8x wood 2x steel |
???????? | ||
| Floor - small | 3x wood 1x steel |
???????? | ||
| Floor - small [2] | 3x wood 1x steel |
???????? | ||
| Floor - small [3] | 3x wood 1x steel |
???????? | ||
| Floor - small [4] | 3x wood 1x steel |
???????? | ||
| Floor - small [5] | 3x wood 1x steel |
???????? | ||
| Walls | Shack wall | 3x wood 4x steel |
???????? | |
| Shack wall - doorway | 5x wood 4x steel |
???????? | ||
| Shack wall - outer cap | 4x wood 9x steel |
???????? | ||
| Shack wall corner [outside] | 12x wood 8x steel |
???????? | ||
| Shack wall corner [inside] | 5x wood 8x steel |
???????? | ||
| Shack wall corner [inside 2] | 6x wood 3x steel |
???????? | ||
| Shack wall and roof | 5x wood 4x steel |
???????? | ||
| Shack wall and roof [2] | 4x wood 4x steel 2x cloth |
???????? | ||
| Wall | 8x wood 5x steel |
???????? | ||
| Wall [2] | 5x wood 9x steel |
???????? | ||
| Wall [3] | 8x wood 5x steel |
???????? | ||
| Wall [4] | 5x wood 9x steel |
???????? | ||
| Wall [5] | 8x wood 5x steel |
???????? | ||
| Wall [6] | 8x wood 5x steel |
???????? | ||
| Wall [7] | 8x wood 5x steel |
???????? | ||
| Wall [8] | 5x wood 9x steel |
???????? | ||
| Wall - corner | 7x wood 3x steel |
???????? | ||
| Wall - corner [2] | 10x wood 4x steel |
???????? | ||
| Wall - corner [3] | 10x wood 4x steel |
???????? | ||
| Wall - corner [4] | 7x wood 3x steel |
???????? | ||
| Wall - corner [5] | 10x wood 4x steel |
???????? | ||
| Wall - corner [6] | 7x wood 3x steel |
???????? | ||
| Wall - end | 4x wood 1x steel |
???????? | ||
| Wall - end [2] | 4x wood 1x steel |
???????? | ||
| Wall - small | 8x wood 2x steel |
???????? | ||
| Wall - small [2] | 8x wood 2x steel |
???????? | ||
| Wall - small [3] | 8x wood 2x steel |
???????? | ||
| Wall - small [4] | 4x wood 9x steel |
???????? | ||
| Wall - small [5] | 4x wood 9x steel |
???????? | ||
| Roofs | Shack roof | 4x wood 6x steel |
???????? | |
| Miscellaneous | Door | 3x wood 3x steel 1x screw |
???????? |
Furniture
| Category | Name | Components | Base ID |
|---|---|---|---|
| Beds | Bed | 4x steel 5x cloth 1x screw |
???????? |
| Mattress | 5x cloth | ???????? | |
| Chairs | Airplane seat (triple) | 8x cloth 5x aluminum 2x screw |
???????? |
| Airplane seat (double) | 6x cloth 4x aluminum 2x screw |
???????? | |
| Airplane seat (single) | 4x cloth 3x aluminum 1x screw |
???????? | |
| Chair | 4x wood 4x cloth |
???????? | |
| 4x wood 2x cloth |
???????? | ||
| Containers | Cabinet | 3x screw 2x steel |
???????? |
| Shelves | Magazine rack | 1x screw 4x steel |
???????? |
| Bookcase | 3x wood 1x steel |
???????? |
Decorations
| Type | Category | Name | Components | Base ID |
|---|---|---|---|---|
| Wall decorations | Mounted creatures | Mounted brahmin heads | 1x wood 2x cloth 2x brahmin skull |
???????? |
| Floor coverings | Floor mats | 2x cloth 1x rubber |
???????? | |
| Miscellaneous | Ice maker | 4x Steel, 1x Rubber | ???????? | |
| Doghouse | 3x wood 1x steel |
???????? | ||
| Wall decorations | Flags | U.S. Flag Minutemen flag Railroad flag Institute flag Brotherhood of Steel flag |
5x cloth | |
Special
| Category | Name | Requirements | Components | Output | Base ID |
|---|---|---|---|---|---|
| Special | Artillery piece | 1 Person | 4x Oil 4x Screw 6x Gear 5x Spring 16x Steel 4x Concrete 4x Wood |
6 Defense | ???????? |
| Special | Eyebot pod |
6 power | 2x Copper 4x Circuitry 6x Aluminum 2x Fiber optics 2x Nuclear material |
???????? | |
| Special | Robot workbench |
6x Gears 4x Oil 4x Screw 4x Plastic 12x Aluminum 6x Fiberglass 3x Circuitry 4x Nuclear material |
???????? |
Stores
| Store Type | Materials | Perk Req. | Business Hours | Caps | Medical | Aid | Ammo | Apparel | Misc | Weapons | Junk | Trader |
|---|---|---|---|---|---|---|---|---|---|---|---|---|
| Trader stand | 5 Wood, 3 Steel, 300 Bottlecap, 1 Settler | Local Leader 2 | 8am - 8pm | 226 | ||||||||
| Trader shop | 5 Wood, 3 Steel, 600 Bottlecap, 1 Settler | Local Leader 2 | 24hrs | 258 | ||||||||
| Trading emporium¹ | 5 Wood, 3 Steel, 1500 Bottlecap, 1 Settler | Local Leader 2, Cap Collector 2 | 7am - 10pm | 239 | Trader Rylee, Holt Combes, Vault-Tec rep | |||||||
| Armor stand | 5 Wood, 3 Steel, 500 Bottlecap, 1 Settler | Local Leader | 24hrs | |||||||||
| Armor shop | 5 Wood, 3 Steel, 1000 Bottlecap, 1 Settler | Local Leader 2 | 8am - 8pm | 390 | ||||||||
| Armor emporium¹ | 5 Wood, 3 Steel, 3000 Bottlecap, 1 Settler | Local Leader 2, Cap Collector 2 | 7am - 10pm | 344 | The Scribe | |||||||
| Weapons stand | 5 Wood, 3 Steel, 500 Bottlecap, 1 Settler | Local Leader 2 | 8am - 8pm | 254 | ||||||||
| Weapons shop | 5 Wood, 3 Steel, 1000 Bottlecap, 1 Settler | Local Leader 2 | 24hrs | |||||||||
| Weapons emporium¹ | 5 Wood, 3 Steel, 3000 Bottlecap, 1 Settler | Local Leader 2, Cap Collector 2 | 7am - 10pm | 347 | Smiling Larry | |||||||
| Food & drink stand | 5 Wood, 3 Steel, 250 Bottlecap, 1 Settler | Local Leader 2 | 24hrs | 242 | ||||||||
| Food & drink shop² | 5 Wood, 3 Steel, 500 Bottlecap, 1 Settler | Local Leader 2 | 24hrs | 240 | ||||||||
| Food & drink restaurant¹ | 5 Wood, 3 Steel, 1500 Bottlecap, 1 Settler | Local Leader 2, Cap Collector 2 | 7am - 10pm | 128 | Ron Staples | |||||||
| Clinic stand | 5 Wood, 3 Steel, 600 Bottlecap, 1 Settler | Local Leader 2, Medic 1 | 8am - 8pm | 522 | ||||||||
| Clinic shop | 5 Wood, 3 Steel, 1200 Bottlecap, 1 Settler | Local Leader 2, Medic 1 | 8am - 8pm | 243 | ||||||||
| Surgery center¹ | 5 Wood, 3 Steel, 1800 Bottlecap, 1 Settler | Local Leader 2, Medic 1 | 7am - 10pm | 352 | Doc Anderson | |||||||
| Clothing stand | 5 Wood, 3 Steel, 200 Bottlecap, 1 Settler | Local Leader 2 | 8am - 8pm | 251 | ||||||||
| Clothing shop | 5 Wood, 3 Steel, 400 Bottlecap, 1 Settler | Local Leader 2 | 8am - 8pm | 131 | ||||||||
| Clothing emporium¹ | 5 Wood, 3 Steel, 1000 Bottlecap, 1 Settler | Local Leader 2, Cap Collector 2 | 7am - 10pm | 141 | Anne Hargraves |
¹ - Adding the appropriate expert trader will unlock the level 4 merchant
² - Can also be labelled 'Bar' depending on localisation.
Cages (Wasteland Workshop)
| Cage Size | Name | Build Requirements | Repair Requirements | Power Requirements | Scrap | Base ID |
|---|---|---|---|---|---|---|
| Small | Cat cage | 6x steel 1x copper 2x softshell mirelurk meat |
1x steel 1x softshell mirelurk meat |
1 | 3x steel 1x softshell mirelurk meat |
xx?????? |
| Dog cage | 6x steel 1x copper 3x canned dog food |
1x steel 1x canned dog food |
1 | 3x steel 1x canned dog food |
xx?????? | |
| Mole rat cage | 6x steel 1x copper 4x radroach meat |
1x steel 1x radroach meat |
1 | 3x steel 2x radroach meat |
xx?????? | |
| Mutant hound cage | 6x steel 1x copper 2x brahmin meat |
1x steel 1x brahmin meat |
1 | 3x steel 1x brahmin meat |
xx?????? | |
| Medium | Feral ghoul cage | 10x steel 2x copper 4x mongrel dog meat |
1x steel 1x copper 1x mongrel dog meat |
1 | 5x steel 2x mongrel dog meat |
xx?????? |
| Gorilla cage[1][2] | 16x steel 4x copper 4x gears 5x wild mutfruit |
1x steel 1x copper 1x gears 1x wild mutfruit |
1 | 8x steel 1x copper 1x gears 2x wild mutfruit |
xx?????? | |
| Gunner cage | 10x steel 2x copper 500x bottle caps |
1x steel 1x copper 50x bottle caps |
1 | 5x steel 250x bottle caps |
xx?????? | |
| Insect cage | 10x steel 2x copper 4x mole rat meat |
1x steel 1x copper 1x mole rat meat |
1 | 5x steel 2x mole rat meat |
xx?????? | |
| Raider cage | 10x steel 2x copper 6x jet |
1x steel 1x copper 1x jet |
1 | 5x steel 3x jet |
xx?????? | |
| Super mutant cage | 10x steel 2x copper 5x brahmin meat |
1x steel 1x copper 1x brahmin meat |
1 | 5x steel 2x brahmin meat |
xx?????? | |
| Large | Brahmin cage | 16x steel 4x copper 4x gears 4x razorgrain |
1x steel 1x copper 1x gears 1x razorgrain |
1 | 8x steel 1x copper 1x gears 2x razorgrain |
xx?????? |
| Deathclaw cage | 16x steel 4x copper 4x gears 4x yao guai meat |
1x steel 1x copper 1x gears 1x yao guai meat |
1 | 8x steel 1x copper 1x gears 2x yao guai meat |
xx?????? | |
| Mirelurk cage | 16x steel 4x copper 4x gears 4x mirelurk egg |
1x steel 1x copper 1x gears 1x mirelurk egg |
1 | 8x steel 1x copper 1x gears 2x mirelurk egg |
xx?????? | |
| Radscorpion cage | 16x steel 4x copper 4x gears 4x stingwing meat |
1x steel 1x copper 1x gears 1x stingwing meat |
1 | 8x steel 1x copper 1x gears 2x stingwing meat |
xx?????? | |
| Radstag cage | 16x steel 4x copper 4x gears 4x carrot |
1x steel 1x copper 1x gears 1x carrot |
1 | 8x steel 1x copper 1x gears 2x carrot |
xx?????? | |
| Yao guai cage | 16x steel 4x copper 4x gears 4x radstag meat |
1x steel 1x copper 1x gears 1x radstag meat |
1 | 8x steel 1x copper 1x gears 2x radstag meat |
xx?????? |
Arena (Wasteland Workshop)
| Category | Name | Build Requirements | Power Requirements | Base ID |
|---|---|---|---|---|
| Contestant platforms | Blue team | 4x wood 10x steel |
– | xx?????? |
| Red team | 4x Wood 10x steel |
– | xx?????? | |
| Miscellaneous | Beta wave emitter[3] | 5x copper 8x aluminum 4x crystal 3x circuitry 5x nuclear material 2x rubber |
1 | xx?????? |
| Quitting time siren | 3x copper 12x steel 1x rubber 2x circuitry 3x glass |
1 | xx?????? |
Resources
Food
| Name | Requirements | Components | Output | Base ID |
|---|---|---|---|---|
| Tato plant | 1 person per 6 units (12 plants) Can only be placed in dirt |
Tato | 0.5 | 00088FAC |
| Mutfruit plant | 1 person per 6 units (6 plants) Can only be placed in dirt |
Mutfruit | 1 | ???????? |
| Corn plant | 1 person per 6 units (12 plants) Can only be placed in dirt |
Corn | 0.5 | ???????? |
| Razorgrain plant | 1 person per 6 units (12 plants) Can only be placed in dirt |
Razorgrain | 0.5 | ???????? |
| Melon plant | 1 person per 6 units (12 plants) Can only be placed in dirt |
Melon | 0.5 | ???????? |
| Gourd plant | 1 person per 6 units (12 plants) Can only be placed in dirt |
Gourd | 0.5 | ???????? |
| Carrot plant | 1 person per 6 units (12 plants) Can only be placed in dirt |
Carrot | 0.5 | ???????? |
Water
| Name | Requirements | Components | Output | Base ID |
|---|---|---|---|---|
| Water pump | Can only be placed in dirt. | 1x concrete 4x steel 1x gear |
3 | ???????? |
| Water pump - powered |
4 power. Can only be placed in dirt. |
2x ceramic 4x copper 4x oil 8x rubber 4x screw 15x steel |
10 | xx?????? |
| Water purifier | 2 power. Can only be placed in water. |
2x oil 2x ceramic 5x rubber 2x copper 10x steel 2x cloth |
10 | ???????? |
| Water purifier - industrial | 5 power and Science! rank 1. Can only be placed in water. |
4x oil 2x ceramic 10x rubber 4x copper 20x steel 4x cloth 6x screw |
40 | ???????? |
Miscellaneous
| Name | Effect | Components | Output | Base ID |
|---|---|---|---|---|
| Scavenging station | Provides randomized junk in workshop inventories when manned. | 5x wood 3x steel |
- | ???????? |
| Trade Caravan Post | A spot for Bunker Hill caravans to visit. | 4x wood 1x steel |
- | ???????? |
| Brahmin feed trough | Brahmin will tend to stay near their feed trough. | 2x steel 8x ceramic |
Fertilizer | ???????? |
| Bell | Ring to gather nearby settlers. | 4x wood 4x steel |
- | ???????? |
| Siren | Alerts nearby settlers to danger when triggered. | 5x copper 9x steel 3x ceramic 1x rubber |
- | ???????? |
| Fast travel target | Only 1 per location. moves the fast travel arrival point | 2x cloth 1x rubber |
- | ???????? |
Power
| Type | Name | Requirements | Components | Output | Base ID |
|---|---|---|---|---|---|
| Generators | Generator - small | – | 2x gear 4x steel 2x rubber 2x copper 1x ceramic |
3 | ???????? |
| Generator - medium | – | 3x screw 3x gear 7x steel 3x rubber 3x copper 1x ceramic |
5 | ???????? | |
| Generator - large | Science! rank 1 | 6x gear 5x screw 4x rubber 10x copper 12x aluminum 3x nuclear material |
10 | ???????? | |
| Generator - windmill | – | 15x steel 4x copper 10x aluminum 2x gear |
3 | 00239530 | |
| Generator - fusion |
Science! rank 4 | 12x gear 10x screw 2x rubber 20x copper 25x aluminum 12x nuclear material 2xcrystal |
100 | xx000CCE | |
| Connectors & switches | Power pylon | – | 2x copper 2x wood 1x ceramic 1x steel |
– | ???????? |
| Power pylon - large | Power connection | 4x copper 3x ceramic 8x steel 1x rubber |
– | ???????? | |
| Power conduit | – | 2x copper 2x ceramic 2x steel |
– | ???????? | |
| Switched power pylon | Power connection | 3x copper 2x wood 2x steel 1x ceramic 1x rubber |
– | ???????? | |
| Switched power pylon - large | Power connection | 5x copper 9x steel 3x ceramic 1x rubber |
– | ???????? | |
| Switch | Power connection | 2x steel 1x copper 1x rubber |
– | ???????? | |
| Pressure plate | Power connection | 3x copper 3x steel 2x spring |
– | ???????? | |
| Laser tripwire | Power connection | 2x fiber optics 4x steel 1x crystal 6x fusion cell |
– | ???????? | |
| Delayed off switch | Power connection | 2x copper 2x wood 1x ceramic |
– | ???????? | |
| Delayed on switch | Power connection | 2x copper 2x wood 1x ceramic |
– | ???????? | |
| Interval switch | Power connection | 2x copper 2x wood 1x ceramic |
– | ???????? | |
| Power counter Briefly transmits power after cycling power 10 times. Used to create automated and timed systems. |
Power connection | 1x copper 1x wood 1x ceramic 2x steel |
– | ???????? | |
| Lights | Construction light | 1 power | 2x glass 1x copper 4x steel |
– | ???????? |
| Miscellaneous | Recruitment Radio Beacon | 1 power | 3x Ceramic 2x Circuitry 6x Copper 2x Crystal 1x Rubber 10x Steel |
– | ???????? |
| Terminal | 1 power Hacker Rank 1 |
2x rubber 2x copper 2x circuitry 2x screw 4x aluminum |
– | ???????? | |
| Lightbox | 1 power | 1x Copper 1x Glass 2x Steel |
– | ???????? | |
| Lightbox |
1 power | 1x Copper 1x Glass 2x Steel |
– | xx?????? | |
| Powered Speaker | 1 power | 1x Circuitry 1x Copper 2x Steel 1x Wood |
– | ???????? | |
| Cycling Light |
1 power | 1x Copper 1x Glass 2x Steel |
– | xx?????? | |
| Oversized Nixie Tube |
1 power | 6x Ceramic 1x Copper 2x Steel |
– | xx?????? | |
| Decontamination Arch |
1 power | 8x Aluminum 4x Circuitry 4x Copper 6x Fiber optics 5x Rubber |
– | xx?????? |
Defense
| Type | Name | Requirements | Components | Output | Base ID |
|---|---|---|---|---|---|
| Turrets | Machinegun turret | - | 8x steel 1x circuitry 2x gear 2x oil |
5 safety | ???????? |
| Heavy machinegun turret | Gun Nut rank 1 | 10x Steel 2xCircuitry 2x Gear 4x Oil |
8 safety | ???????? | |
| Laser turret | 2 power Science! rank 1 |
3x crystal 6x aluminum 4x circuitry 1x screw 4x fiber optics 2x gear 3x nuclear material |
8 safety | ???????? | |
| Heavy laser turret | 2 power Science! rank 3 |
4x Crystal 7x Aluminum 4x Circuitry 4x Screw 4x Fiber optics 3x Gear 4x Nuclear material 3x Steel |
12 safety | ???????? | |
| Spotlight - wall-mounted |
1 power |
1x Circuitry x1 Screw 2xGear 6xSteel 1xOil 2x Glass |
2 safety | ???????? | |
| Spotlight | 2 power |
1x Circuitry x1 Screw 2xGear 6xSteel 1xOil 2x Glass |
2 safety | ???????? | |
| Shotgun turret | 2 power Gun Nut rank 2 |
4x Aluminum 5x Circuitry 4x Screw 4x Gear 5x Oil 6x Steel |
8 safety | ???????? | |
| Missile turret | 2 power Gun Nut rank 3 |
6x Aluminum 6x Circuitry 5x Screw 5x Gear 6x Oil 6x Steel |
15 safety | ???????? | |
| Guard posts | Guard post | 1 person per 3 Posts | 10x wood 4xsteel |
2 safety | ???????? |
| Guard tower | 1 person per 3 Posts | 12x wood 6x steel |
2 safety | ???????? | |
| Traps | Tesla arc | 1 Power | 2x Steel 3x Copper 1x Circuitry |
2 Defence | ???????? |
| Radiation emitter | 1 Power | 2x Steel 2x Lead 3x Nuclear material 2x Screw |
2 Defence | ???????? | |
| Flamethrower trap | 1 Power | 6x Oil 4x Aluminum 4x Rubber 2x Screw |
3 Defence | ???????? |
Notes
- If more than four settlers do not have a job, no new settlers will arrive. Settlers include humanoids and brahmin, but exclude provisioners. Brahmin produce fertilizer and improve crop yield. Joblessness does not affect happiness. Robots, to include synths, can never have individual happiness above 50. Production stops when workshop inventory reach certain, rather modest, levels.
- The largest water producing settlements are Spectacle Island at 10,000+ water, the Castle at 2,500-4,000 water, and Sanctuary Hills at up to 3,200 water.
- It is possible to have ghouls as settlers outside of the ghoul settlement of the Slog. They arrive as normal settlers and can even be replaced by a synth. They arrive from a normal random pool of possible settlers.
- Unlike companions, settlers do not consume ammo. As long as they have a small amount of ammo in their inventory they will be able to use any weapon given to them. This means one can give them very advanced and/or ammo-hungry weapons such as miniguns, flamers, or plasma as long as given to them at least 1 "shot" for it. For weapons that use a minimum amount of ammo per activation, like the minigun, one will need at least that minimum. This does not work for the missile launcher or Fat Man as these are tagged with "NPCs Consume Ammo". The same holds true with grenades. The exception to this exception is robots, who have unlimited ammo for all built-in weapons including missile and fat man launchers (can build on sentry bot chassis shoulder slots in Automatron DLC).
- Excess water and crops will be placed in the workbench. In the case of the former, this can be exploited for great effect via industrial water purifiers, making them an excellent way to make large sums of money from the settlements, especially when paired with trading booths. Crops may be added to the workbench, but at a far slower rate than picking them manually.
- Water and crops will be placed in workbenches after 24 in-game hours and 8 real time minutes. Staying in the same settlement as the workshop or staying directly next to the workshop does NOT influence the time it takes for water and crops to be placed in the workshop.
- Purified water does not stack in the workbench. If 200 purified water is placed into the workbench for example, no more will be placed there until it is removed. Caps will continue to grow whether removed or not.
- Settlement population is limited by the player character's Charisma. The default cap is 10, +1 for each point in charisma, meaning one can have a population cap of 20 (10+10). This can be further increased by wearing charisma boosting clothing and consumables. It is possible to get 42 settlers with a base Charisma of 10, reading a S.P.E.C.I.A.L. book after alcohol addiction, the Charisma bobblehead, wearing Summer shorts, 4x 'Sharp' (Legendary) armor pieces (left/right arm/leg), as well as a Charisma-boosting hat and glasses, and consuming Grape Mentats, beer with the Party Boy/Girl level 2 perk, Day Tripper and X-cell. Go to a settlement, wear the gear, pop the chems, and move settlers from the settlement to the desired settlement.
- There is a limit to the amount of settlement components that can be built; this is indicated in the workshop interface on the bar found in the top-right corner labeled as "Size." Currently there is a bug (or actual game mechanic) that can circumvent the limit. Dropping unwanted Weapons then scrapping them (or merely storing them) will lower the limit either minimally or greatly, depending on the complexity of the item being scrapped (or stored). Weapons with multiple prefixes work best. This is due to the game treating items as part of the settlement components (the inherent mats that can be scrapped are components) and subtracts these "components" from the limit. Since this is probably a bug, there may be consequences using this exploit, so use at your own risk.
- While in the workshop menu, the player character can scrap certain static objects into components such as cars, lamp posts, mailboxes, toilets etc. If a container is scrapped its contents will be transferred to the workshop, even if it is a locked container such as a safe.
- When the workshop menu is open one can assign settlers to structures, such as trading stands, Guard Posts and crops. The Sole Survivor can also order them to walk somewhere, to permanently move to a different settlement, or to set up a supply line with another settlement.
- Setting up a supply line between settlements allows sharing items classed as junk and aid between them. This means things like steel, wood, melon, mutfruit and caps are shared.
- Clarification: Food and water production will be shared for the purpose of feeding settlers, and items in workshop inventories will be shared for the purpose of crafting. This applies to all items, and even complete weapon/armor mods (and Automatron DLC robot parts) - you can deposit, say, a Laser Short Scope in the workshop at settlement A and then attach it to a laser gun at a weapon workbench at connected settlement B. However, they are not physically shared. The Sole Survivor can remotely consume purified water at settlement A in the process of crafting vegetable starch adhesive at settlement B, but cannot physically pull it out of settlement B's workshop and add it to their personal inventory. It does however mean that one can dedicate a few settlements for producing excess food and water while others scrap, do trade routes, man cannons, or do other tasks.
- Scavenging stations can be used to gather raw resources. Such as steel, concrete, nuclear materials, rubber, cork, etc. What resources one gets appears to be random. The player character character needs to assign a settler to work the Scavenger bench.
- A single settler assigned to harvesting food can work 6 food units worth of crops, whether they're the standard 0.5 units per plant or mutfruit's 1.0 unit per plant.
- A single settler assigned to defense will patrol between several guard posts and can support the benefit of up to three guard posts (giving a total of 6 defense per assigned guard assuming the Sole Survivor has sufficient guard posts).
- Traps (the Tesla Arc, Radiation Emitter and Flamethrower Trap) require power and will go off immediately if hooked to a live power connector. They can be hooked to a switch for manual triggering, or to laser tripwires or pressure plates for automatic triggering. By default any presence will set off these automatic triggers. If a terminal is connected to these triggers it may be used to modify them so only a hostile presence sets them off. Traps must be repaired after they are triggered.
- Building a bar results in the settlers going out in the evening to have a drink, they will then sit and drink around the bar, if chairs are provided close to it.
- After a questline with Bunker Hill one can start to get caravans from there that will make the player character profit. One can find the 'trade caravan post' in resources → miscellaneous.
- Settlers don't make a difference between a working store and a closed one. They often make a line near a bar or a store even when no one is serving there.
- Power will occasionally become red in Workshop mode despite being more than sufficient. This indicates a broken power generator that needs repairing or something that requires power has been placed but is not hooked up to a placed power source.
- It is possible for some settlers to be a synth which may cause an attack on the settlement from the Institute. These settlers may also reveal themselves or be found out, which will cause them to become hostile--and usually quickly killed by the rest of the settlement.
- Food and water is "consumed" by settlers, while any excess water and food that generates in the Workshop container is indirectly shared between settlements, meaning one settlement can produce enough food for multiple settlements.
- Try building turrets on elevated, otherwise inaccessible spots, such as the wall posts to both sides of the bridge leading into Sanctuary Hills or on rooftops. If no such spots are readily available, placing an elevated shack foundation and setting up the turrets on top of that works just as fine. This affords them much better sight lines, fields of fire and increased effective range. On top of this, this makes melee attacks against turrets a non-issue, as well as making grenades and missiles more likely to miss the turrets completely instead of doing splash damage. Just make sure the turrets can still be reached for repairs. Note that elevated shack foundations can be built on top of each other and linked to the ground with improvised spiral stairs that wind around them. Even a two-story tower of this kind stands roughly twenty feet tall and - when built in the village center - usually can and will annihilate everything that comes into sight of the settlement (not to mention the additional firepower one can install on every level below the upper one, if opted for the wooden foundations over the concrete model). This tactic frees from having to install electricity all around the settlement and allows to concentrate it on one or two spots which, given that raiding parties often spawn very near or even inside the villages, is where one will want to have the heavy guns anyway.
- You can also remove the elevated shack and leave the turret "floating" in mid air, which offers a whole 360 degree view of its surrounding area. If one is to do so, make sure you can reach it for repairs. The turret will remain in mid air even after a restart.
- If called upon to defend a settlement but can't find any hostiles when you arrive, it usually means a pack of feral ghouls is about to attack. Due to their low walking speed and erratic movement, it can sometimes take several minutes for them to actually reach the settlement. Patrol the perimeter and check the surroundings, but be careful not to leave the settlement's boundaries for a preemptive strike. The game may fail to register the defense as successful in such a case, leaving with no more attackers to kill and a mission objective that can't be completed anymore.
- Machine gun turrets and heavy machine gun turrets have multiple levels that are built randomly, ranging from Mk. I to Mk. 7. The level of the turret can be changed by storing it, then building it again. When building a turret look at the model on the side before placing it; another version can be chosen (randomly) by going back to the main turret list, then re-selecting the turret type. The color of the barrels on the turrets changes based on their level, as does the ammunition and damage they have. It appears that the turret levels level similarly to enemies, based on the distance from Sanctuary Hills. Higher level turrets do more damage and have stronger ammunition (Explosive, Incendiary, etc.). The text on the barrel and body of the turret describes the ammunition carried in the turret.
- If the frequency of Minutemen quests to help existing settlements becomes excessive, they can be slowed by leaving them at the final stage of talking to Preston Garvey. By waiting at the final step, the full quest timer will expire before another is generated, at which point the quest completes and the XP will be given without ever speaking to Preston. However, quests initiated by settlers directly rather than by Preston or Radio Freedom will fail if not turned in by the end of the quest timer to the settler. This also does not apply to calls to defend settlements from raids.
Budget settlement (Sanctuary)
Build supports 20 settlers, minimum 11. When setting up camp, place the medium generator, water purifiers and recruitment radio beacon close together. The generator can support all 3 items by itself. Each settler can maintain 6 units of food (6 mutfruit or 12 of any other crops), so 4 settlers can maintain 24 food. Settlers that do not maintain food can be set to guard duty. Each guard can man 3 guard posts, so 7 settlers can man the 20 guard posts required. Mutfruit plants can be obtained at Greentop Nursery, Graygarden, or Warwick homestead.
- People - x1 recruitment radio beacon
- Beds - x20 sleeping bag
- Food - x20 mutfruit (requires 4 settlers)
- Water - x2 water purifier
- Power - x1 medium generator
- Defense - x20 guard post (requires 7 settlers)
Minimum Cost
- 11 settlers (supports 20)
- 200 wood
- 64 cloth
- 117 steel
- 20 mutfruit plant
- 18 copper
- 14 rubber
- 8 ceramic
- 4 oil
- 3 screws
- 3 gears
- 2 circuitry
- 2 crystal
Alternately, the player character can build x7 water pumps, at a cost of:
- 28 steel
- 7 concrete
- 7 gears
Advanced settlement building techniques
There are some ways to get around the clipping of settlement objects with each other and preexisting objects in the world to allow you to build more sophisticated structures. These can all be done without mods however some will require using the game console. See Fallout 4 console commands for the full list of console commands.
- Mat Exploit
You can achieve this by placing a small door mat down and then placing a larger item like a wall on top of it. when you select the mat by holding down the select button it will also pick up the items linked on top however the collision will only be enabled for the floor mat, enabling you to potentially clip the larger object into other objects provided the mat isn't clipping with anything.
- Console
- TCL
The console command tcl will disable clipping to yourself. It will also turn off clipping for any objects you place down or select while in this mode, allowing you to put other objects inside of it. If you have an object placed that you want to put another object inside of you simple select that object then deselect it to disable its collision. You can then place down an object inside of it. Once you remove the collision you will also remove the ability to select that item. To restore collision simply enter tcl into the command again to reactivate clipping. You can enter tcl again to go back into tcl and begin removing collision again.
This command is best used for junk wall placement to allow you to join the sections of wall together.
- Console
- modpos
Modpos will allow you to move any object in the game that is selectable within the console. To target an object simply click on it when you have the console open. Modpos will require you to specify an axis and also an amount to move an object by. Because you are forcing the object to be moved through console this will ignore all collision and will allow you to move the object anywhere you wish. Each unit of movement is quite small and you can get a high degree of accuracy.
Some sample distances:
- 1 full size floor object length = 256
- 1 full size floor object height = 15
- 1 upper shack floor object height = 22
- 1 wall height = 202
- Distance between floors (Z axis), non-prefab, using the standard 1 full square stair set = 224
- Console
- setpos
While Modpos moves a selected object a given distance, Setpos moves it to specified x, y, or z coordinates. Both ignore any clipping including with the original environment. Setpos is most useful when dealing with an item that snaps to another and the game will preview the object in the correct position but will not place it there. For example, you can get the coordinates of a wall while it is in the preview location, then place it on the other side of the floor in an allowed location, then use Setpos to move it back to the preview location already placed.
To use it, open the console while the object is snapped into the preview position. Click on the object and get its x, y and z coordinates in that location with:
- getpos x
- getpos y
- getpos z
Close the console. Now place the object elsewhere in the same orientation, parallel to the final destination. With the object placed, open the console again, and with the object still selected use the following, replacing # with the number shown by Getpos for that axis.
- setpos x #
- setpos y #
- setpos z #
If you need to scroll back up in the console to get the coordinate, the PageUp and PageDown buttons may be used.
- Unlimited size
When you're building big settlements, often you are confronted with a full size bar. This means that, according to the game mechanics, you can't place another item in your settlement. A quick work-around can help you to easily reduce your settlement size, which enable you to place more items.
- Place the weapons in the workbench
- Remove the weapons from the workbench
- Drop the weapons on the ground
- Enter workshop-mode
- Click on the weapons, and store them in the Workshop
Doing this will reduce your settlement size, and enables you to build bigger settlements.
Alternatively it is possible to increase the build limit by using console commands. The build limit is calculated by two actor values, namely triangles and draws. To raise them, the player has to open the console while facing the workshop and select it to get the workshop ID, then type in the console command 'getav 349' to display the maximum amount of triangles (348 displays the current number). Then one has to use the console command 'setav 349' in combination with a number higher than the current maximum to increase the maximum number of triangles to an amount specified. The same has to be done with the actor value 34b for the number of draws (34a displays the current number).
- getav 348 displays the current number of triangles
- getav 349 displays the maximum number of triangles
- setav 349 <amount> changes the number of triangles to the specified amount
- getav 34a displays the currentnumber of draws
- getav 34b displays the maximum number of draws
- setav 34b <amount> changes the number of draws to the specified amount
- Moving build structures
Objects that are joined into full structure can be moved as one object. Example: If you have built a shack on one end of a settlement (walls and floors with lamps, desk atc.) you can move it it as a one item. In build mode you hold your select button ('e' fot PC) on one element (preferably you choose wall from outside) and whole structure will be selected. Now you can move your shack on the other side of your settlement.
Quests
The player character can get radiant quests that randomly select different settlements. Minutemen radiant quests
Bugs
 When away from a settlement, the Pip-Boy's workshop section on the data screen may show incorrect values for a settlement's statistics, such as water and beds. This occurs when the player character enters an exterior cell close enough to a settlement such that only a subset of the settlement's exterior cells are loaded into the simulation engine. The result is that only those objects in the loaded cells are included in the statistics. Unfortunately, the settlement will experience the expected negative consequences of this, such as the happiness score dropping, and settlers may become unassigned from their beds. The effect will be more noticeable in larger settlements, such as Sanctuary Hills, which are composed of a larger number of exterior cells, and in the case of Spectacle Island, this can occur without even leaving the island. It will not affect settlements which only consist of a single cell, such as County crossing.[verified]
This is a fundamental limitation of the simulation engine, so there are no methods to permanently prevent this from occurring, though several workarounds and temporary fixes exist:- Returning to the affected settlement and opening the workshop should correct the statistics. In the case of Spectacle Island, you may have to travel to the center of the island to ensure all the cells have loaded.
- Replacing all pre-existing beds in a settlement may prevent settlers from becoming unassigned from or not assigning themselves to these beds. On PC, if scrapping is not possible, selecting the bed to be removed in the console and using commands disable and then markfordelete will permanently remove the selected beds.
- One can fix this by group selecting preexisting beds and moving them onto a floor. Scrapping or storing the floor will then delete the bugged bed.
- Manually assigning all settlers to a bed using the command option in the workshop menu may prevent settlers from becoming unassigned from their beds.
- If a distress pulser is dropped on the ground in a settlement and then scrapped using the building screen it will permanently emit a distress signal.[verified]
- After choosing 'barter' at a user-created settlement shop, the trade window may open to two blank lists (player character and settler inventories are empty), where the settler has 0-6 caps and nothing can be done except exiting.[verified]
- Exiting the trade menu, selecting the 'all items' category in the Pip-Boy and then retrying barter may resolve this bug.
- Settlers with a coded routine may continue it at the expense of an assigned job. This occurs mainly with original settlers from before a settlement is unlocked, and some named settlers. Examples include Sturges or Marcy Long rarely being present at a store if assigned (though still bartering from wherever they are), robots at Graygarden tending plants regardless of assignment, and original settlers in Greentop Nursery assigned to guard posts spending time sitting in chairs inside the house, while new settlers assigned the same roles do not. For assignments like guard duty where being in the correct location matters, a new settler may be a better choice.[verified]
- When fast traveling to a settlement, settlers may be seen standing on the roofs of natural or player character-built structures with no way of getting to the top of them.[verified]
- Fast-traveling to the settlement again should make them return to the ground.
- Beds that are under cover (even in an entirely enclosed building) may not be recognized as such, impacting settlement happiness.[verified]
- ↑ Requires that the Sole Survivor evacuate the Institute during The Nuclear Option.
- ↑ The gorilla cage is not necessary to obtain the Trapper achievement/trophy.
- ↑ Requires Rank 1 of Animal Friend and Rank 1 of Wasteland Whisperer.