No edit summary Tag: sourceedit |
No edit summary |
||
| (6 intermediate revisions by 6 users not shown) | |||
| Line 14: | Line 14: | ||
}}{{Games|FO3MZ}} |
}}{{Games|FO3MZ}} |
||
| − | {{Quotation|Pretty obvious, wasn't it? They're putting on a big show, trying to scare us. Means we're getting under their skin. That's a good thing. Of course, now it looks like we've got a big Death Ray thing we need to take down before they blow up the whole damn planet. But it's nice to know we're having an effect, don't you think?|[[Somah]] |
+ | {{Quotation|Pretty obvious, wasn't it? They're putting on a big show, trying to scare us. Means we're getting under their skin. That's a good thing. Of course, now it looks like we've got a big Death Ray thing we need to take down before they blow up the whole damn planet. But it's nice to know we're having an effect, don't you think?|[[Somah]]|sound=Fo3MZ_Somah_PrettyObvious.ogg}} |
The '''Death Ray control''' is a location on board [[Zeta|Mothership ''Zeta'']]. It is a single large room serving as the control center for ''Zeta's'' [[death ray]]. |
The '''Death Ray control''' is a location on board [[Zeta|Mothership ''Zeta'']]. It is a single large room serving as the control center for ''Zeta's'' [[death ray]]. |
||
==Layout== |
==Layout== |
||
| − | There are four power generators in the corners of the room |
+ | There are four power generators in the corners of the room, which have to be destroyed as a part of the quest [[This Galaxy Ain't Big Enough...]]. The Death Ray itself is visible beneath the glass floor. The room has two teleporters leading to the [[living quarters]] and the [[Death Ray hub]] area. |
The Death Ray can be fired from this room by using the buttons on the two consoles. The two buttons on the right aim the Death Ray to one of two pre-targeted locations. The buttons on the left (as the holographic "signs" appearing above them signify) bring one of the four generators out of the floor (button to the extreme left) and fire the Death Ray (second button from the left). |
The Death Ray can be fired from this room by using the buttons on the two consoles. The two buttons on the right aim the Death Ray to one of two pre-targeted locations. The buttons on the left (as the holographic "signs" appearing above them signify) bring one of the four generators out of the floor (button to the extreme left) and fire the Death Ray (second button from the left). |
||
| Line 41: | Line 41: | ||
==Gallery== |
==Gallery== |
||
<gallery widths=220 captionalign=center> |
<gallery widths=220 captionalign=center> |
||
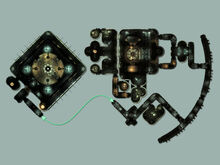
| + | FO3MZ Death Ray map.jpg|Map of the hub and Control |
||
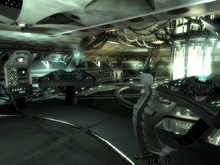
DeathRayControl.png|The controls |
DeathRayControl.png|The controls |
||
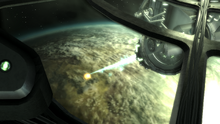
Death Ray firing.png|Death ray, firing{{Inline quote|sound=Obj_dlc05deathray_fire.ogg}} |
Death Ray firing.png|Death ray, firing{{Inline quote|sound=Obj_dlc05deathray_fire.ogg}} |
||
| Line 51: | Line 52: | ||
[[ru:Зал управления Лучом смерти]] |
[[ru:Зал управления Лучом смерти]] |
||
| + | [[uk:Зал керування Променем смерті]] |
||
Revision as of 02:39, 17 February 2020
The Death Ray control is a location on board Mothership Zeta. It is a single large room serving as the control center for Zeta's death ray.
Layout
There are four power generators in the corners of the room, which have to be destroyed as a part of the quest This Galaxy Ain't Big Enough.... The Death Ray itself is visible beneath the glass floor. The room has two teleporters leading to the living quarters and the Death Ray hub area.
The Death Ray can be fired from this room by using the buttons on the two consoles. The two buttons on the right aim the Death Ray to one of two pre-targeted locations. The buttons on the left (as the holographic "signs" appearing above them signify) bring one of the four generators out of the floor (button to the extreme left) and fire the Death Ray (second button from the left).
The generators rise out of the floor in sequence around the room starting at the left of the consoles. It apparently only takes one generator to power the Death Ray, as the other three do not rise when the Death Ray is fired (and the Death Ray will fire with only one generator left).
The Death Ray can be re-aimed at an unspecified target on Earth and fired multiple times, producing a spectacular mushroom cloud. Firing the Death Ray at Earth has no effect on Karma, or on the game itself.
Related quests
Notes
- This is one of many areas of the ship that will not be accessible after the player has completed the main (This Galaxy Ain't Big Enough...) quest.
- After two generators in this room are destroyed, approx. 5 aliens will appear from the teleport pad in the corner opposite to that generator.
- When all 4 generators have been destroyed, the force-field door to the Living Quarters is opened.
- The player can fire the death ray multiple times at the same place and the crater gets no deeper, but dust still flies around the general area.
Appearances
Death Ray control appears only in the Fallout 3 add-on Mothership Zeta.
Gallery
| |||||||||||||||||||||||||||||||||||||||||||||||||||||


